Ella Cami - Not just sleepwear
It must have been the fabric fumes.

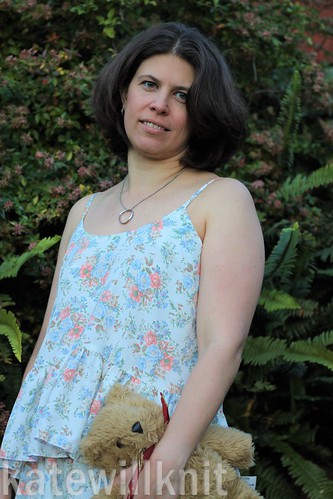
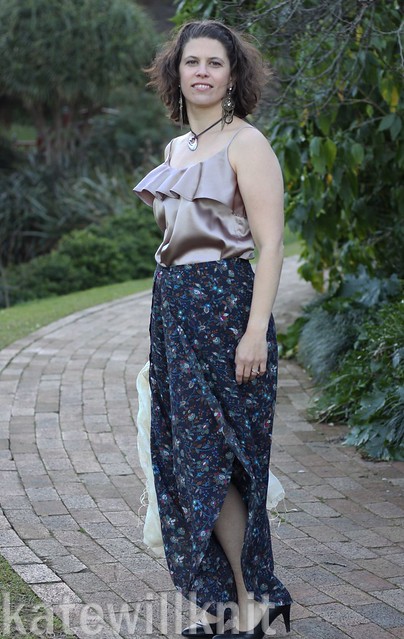
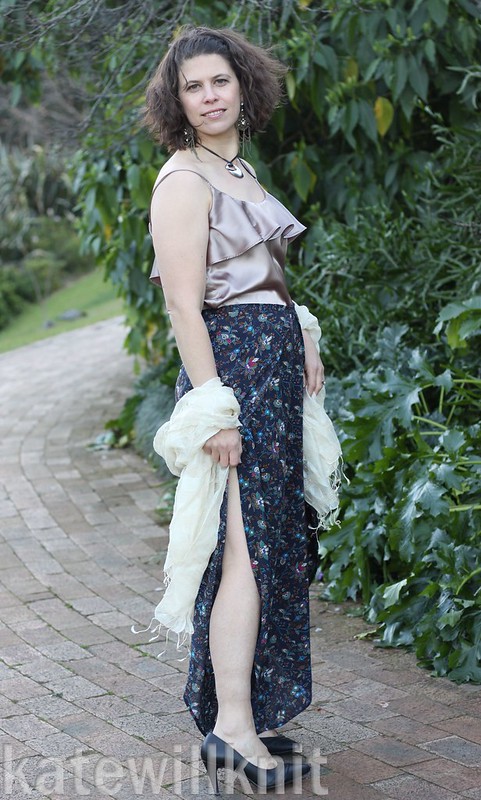
It's the only explanation. I had originally planned to remix the Piko Top by EYMM, turning it into a cosy & comfortable tunic (with pockets like this) to wear with leggings on a wintry evening. I even made a standard version as a starting point, to wear with my Hudson Pants. But I ended up making some changes to the Ella Cami, so I would have a pretty top to wear with my Ravanna pants (pattern here*). Never mind that it's currently the middle of winter, and blowing a gale. But I did have some gorgeous taupe satin sitting on the end of the ironing board, and visions of flounces in my head. The original Ella (by Designer Stitch) is designed as a loose fitting cami with a ruffle at the bottom, as part of a sleepwear set. Here it is in it's standard form (click through to my Ella blog post to find out how to grab it for free).
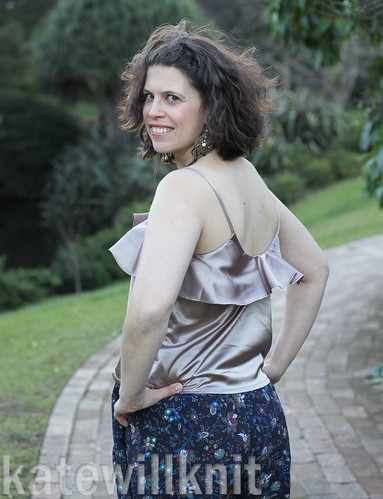
But I wanted to wear it more as a top. And swap the ruffle at the bottom with a flounce around the neckline. Like this:

The first step was to go down a size in the pattern. The original is sized for sleepwear, and I wanted something that wouldn't be in danger of coming adrift. I threw caution to the wind, and kept the same size all over (I usually size out one size from bust to waist) - or maybe I just forgot about that when cutting out the pattern - figuring there was plenty of drape to go around.
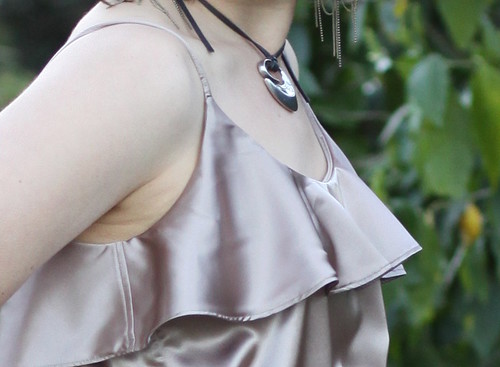
To account for the ruffle coming off the bottom, I lengthened the bodice at front and back 3.5" (probably should have been a bit more, but that's how much room I had on the scrap of paper I grabbed at the time). The pattern has a lengthen shorten line, so I split it there, added the length, and smoothed out the curve. To make the neckline flounce I figured out that I wanted a half circle at front, and another at the back. Ann (the amazing brains behind Designer Stitch) gave me some pointers on how to make this piece. To start I traced out another front and back bodice top (about 4 inches long from the centre and side points). I then cut these pieces into strips, nearly to the top edge, and flared the pattern piece out to make a quarter circle (it would be cut on the fold).
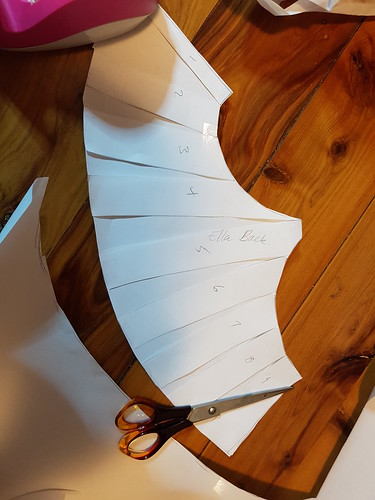
My first version had a few issues - side seams were not quite the same length, there was a lot of fabric over my breasts, but not much ruffle in between. I redid the pieces, redistributing the flares, and taking into account the centre fold (so the piece near there was smaller than the others). Ann also suggested mirroring the piece, and cutting it on the bias to help it flounce more at the centre - so that will be on the agenda for next time.
With all the kinks sorted out, and pattern pieces ready to go, it was time to cut into my lovely satin. I was nervous about sewing with satin at first, but I found it easier to sew with than chiffon (less prone to pull out of shape).
The seams at the side of the flounce are felled to keep all the edges nice and neat, and avoid any overlocking stitches from showing. I really felt the absence of a rolled hem foot, but made do with a three thread overlock turned up and stitched down to hem the flounce.
It looks like there has been a bit of a hiccup with some puckering on that side seam. Of course it's the kind of thing you don't notice till photos are done.
All up, I love the way this top works with my Ravanna pants. It's interesting enough on it's own, but doesn't overpower the lovely drapey tulip wrap of the pants.

It's the only explanation. I had originally planned to remix the Piko Top by EYMM, turning it into a cosy & comfortable tunic (with pockets like this) to wear with leggings on a wintry evening. I even made a standard version as a starting point, to wear with my Hudson Pants. But I ended up making some changes to the Ella Cami, so I would have a pretty top to wear with my Ravanna pants (pattern here*). Never mind that it's currently the middle of winter, and blowing a gale. But I did have some gorgeous taupe satin sitting on the end of the ironing board, and visions of flounces in my head. The original Ella (by Designer Stitch) is designed as a loose fitting cami with a ruffle at the bottom, as part of a sleepwear set. Here it is in it's standard form (click through to my Ella blog post to find out how to grab it for free).
But I wanted to wear it more as a top. And swap the ruffle at the bottom with a flounce around the neckline. Like this:
The first step was to go down a size in the pattern. The original is sized for sleepwear, and I wanted something that wouldn't be in danger of coming adrift. I threw caution to the wind, and kept the same size all over (I usually size out one size from bust to waist) - or maybe I just forgot about that when cutting out the pattern - figuring there was plenty of drape to go around.
To account for the ruffle coming off the bottom, I lengthened the bodice at front and back 3.5" (probably should have been a bit more, but that's how much room I had on the scrap of paper I grabbed at the time). The pattern has a lengthen shorten line, so I split it there, added the length, and smoothed out the curve. To make the neckline flounce I figured out that I wanted a half circle at front, and another at the back. Ann (the amazing brains behind Designer Stitch) gave me some pointers on how to make this piece. To start I traced out another front and back bodice top (about 4 inches long from the centre and side points). I then cut these pieces into strips, nearly to the top edge, and flared the pattern piece out to make a quarter circle (it would be cut on the fold).
My first version had a few issues - side seams were not quite the same length, there was a lot of fabric over my breasts, but not much ruffle in between. I redid the pieces, redistributing the flares, and taking into account the centre fold (so the piece near there was smaller than the others). Ann also suggested mirroring the piece, and cutting it on the bias to help it flounce more at the centre - so that will be on the agenda for next time.
With all the kinks sorted out, and pattern pieces ready to go, it was time to cut into my lovely satin. I was nervous about sewing with satin at first, but I found it easier to sew with than chiffon (less prone to pull out of shape).
The seams at the side of the flounce are felled to keep all the edges nice and neat, and avoid any overlocking stitches from showing. I really felt the absence of a rolled hem foot, but made do with a three thread overlock turned up and stitched down to hem the flounce.
It looks like there has been a bit of a hiccup with some puckering on that side seam. Of course it's the kind of thing you don't notice till photos are done.
All up, I love the way this top works with my Ravanna pants. It's interesting enough on it's own, but doesn't overpower the lovely drapey tulip wrap of the pants.
This post was originally published as part of the The Monthly Stitch's Indie Pattern Month Week 3 Challenge - Hack it!
*This post contains affiliate links. If you click through and make a purchase, I receive a small commission at no extra cost to you. The sewing, opinions and amazing work with scissors and tape are all my own.


I like the result. Never knew there was so much to think about when adjusting a Pattern like that
ReplyDelete